Safe Shoe Horseshoe Removal Tools & Methods
Safe Shoe Horseshoe Removal Tools & Methods
BY DEAN LEWIS
This article explains how to safely remove a horseshoe from a horses hoof, and why you may need to get a horseshoe removal tool or horse shoe removal kit to help!
There are several reasons for horseshoe removal, and it is a great skill to have in case of an emergency.
As we all know, horses have a great knack of lifting or springing shoes especially when we least expect it.
Usually, it is just before a show or competition and most times it just so happens your farrier is away or unable to get there!
In this article we will cover the process of safely removing a horseshoe and using a horseshoe removal tool or horse shoe removal kit makes the job a lot easier. Also, knowing the right procedure means horse owners and carers know what to do in an emergency too!
So, WHY might we need to remove a horseshoe?
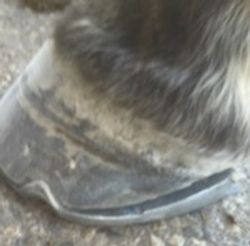
Perhaps the shoe has been sprung? This is when the heel of the shoe is not in contact with the hoof surface. A gap appears between the horseshoe and the heel quarter of the horse’s hoof. This problem can predispose the horse to catching the horse shoe either whilst competing or in the paddock. If the horse catches its shoe, it can further dislodge the shoe and cause further injury to itself by standing on a nail or a clip, thus puncturing the sole.
Has the horseshoe been dislodged or twisted? Similarly, one side or sometimes most of the shoe can be dislodged or twisted, only being held on with a few nails. Again, this could lead to the horse further injuring itself by standing on a nail or a clip, thus puncturing the sole.
Other reasons for safe horseshoe removal may include to turn the horse out for a break in the paddock, to allow a veterinarian to take radiographs or to treat an abscess by applying a poultice.
Now that we understand WHY we might be required to remove a horseshoe, let us go through the WHAT:
What tools do we need to remove a horseshoe safely? First, we need to have the correct Personal Protection Equipment (PPE). This includes closed toed boots, an apron to protect the legs from nails, protective glasses, and gloves (optional).
We also require a hoof pick & wire brush, Shoe Puller, Crease Nail Puller, Clinch Cutter, Clincher, Driving Hammer, Rasp and Rasp Handle. All these horseshoe removal tools can be found in the Mustad Emergency HorseShoe Removal Kit.
Another essential item and a great asset to horse owners and farriers alike, is a hoof stand or hoof helper. They help and act as a third hand not only when removing shoes but also for general hoof care.
Now you understand WHAT you need to remove a horseshoe, we can now discuss HOW to remove them.
But, before we go into all the details, let us just take a moment to explain what a clinch is.
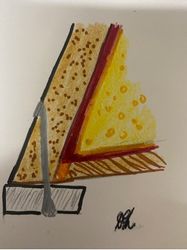
A clinch is a small portion of the nail that is turned over on the outside of the hoof wall, so the nail does not easily come out and the shoe stays firm.
After the nail is safely driven through the hoof wall, the farrier then cuts off the excess, leaving only a short portion of the nail (usually as long as the width of the nail).
To safely remove the clinch, farriers usually use a clinch cutter and a nylon mallet. The cutter is placed under the clinch and hit with the mallet to cut the clinch off. When learning this procedure, some people find this process difficult, so opt to rasp the clinch off instead. When attempting to rasp a clinch off you should take care to try and not rasp the hoof wall. You may find an older, blunter rasp a better tool for this job, as it will not compromise the wall integrity.
It’s not essential, but many people find it easier to remove the horseshoe nails one at a time. For this you can use a pair of nail pullers.


See above the nail clinches that Section diagram showing how a nail
must be carefully removed first. is clinched to hold the horse’s shoe in place.
So, once we have the correct PPE, the required tool and understand what a clinch is, how do we safely remove a horseshoe?
1. Firstly, remove all foreign material with your hoof pick and wire brush to ensure the horse has not pricked or punctured the sole.
2. Remove the clinches on the nails by either, cutting the clichés off with the clinch cutter and mallet or rasping the clinches off with your rasp!
3. At this point you can proceed to remove the nails one at a time with your nail pullers. Alternatively, you can use your shoe pullers. You use a shoe puller by firstly placing them between the hoof and the horseshoe. Then holding the horse's foot firmly between your legs, starting from the heels of the shoe, pull in a downward and inward motion just enough to lift and loosen any nails. You can then use your shoe pullers to grasp the top of the loose nail and remove it!
4. Continue to carry out this procedure progressing forward a little at a time toward the toe, until all the nails have been removed. The horseshoe will then come off!
Like anything, the more you practise the easier it will become. You may see your farrier perform this task with what appears to be the minimum of effort, but it is a skill they have perfected over time, anyone can undertake the removal of horseshoes given time and practice.
You may even ask your farrier to show you how to do it in an emergency. He or she will most likely be happy to help, as it may prevent a far bigger problem in the future! If a loose shoe comes off while the horse is being ridden or out in the paddock it can break the horse’s foot away and/or injure the horse.
So, what’s next? After we have safely removed the horseshoe, you may want to protect the hoof from damage until your farrier can come back to replace the shoe.
There are several things you can do to protect the hoof. Some people may use a hoof boot for such an emergency. You could also simply place a hoof pad on the sole and wrap the hoof with Elastoplast. Both methods will assist to prevent damage to the hoof wall or excessive wear on the solar surface. It’s a good idea to have an emergency kit/plan ready just in case such an event occurs. Like most of us with horses know, it always happens when you least expect it!
Being prepared and implementing these preventative measures will help you, your horse, and your farrier so that you will be back on track with minimum delay.
Best of Luck, Dean Lewis AWCF

